Spring Boot 3에서 SpringDoc과 Swagger를 이용해 API 문서 자동화 해보기
2022년에 지인과 함께 재고관리 시스템을 만들었을 때 수동으로 API 문서를 작성했습니다. 지금 생각해보면 API 문서를 자동화할 수 있는 기술에 대해 찾아보자는 생각도 없이 예전 경험만 생각해서 작업했네요.
Spring Boot에 대해서 공부하면서 Swagger에 대해 알게되었고 재고관리 시스템의 일부 API에 적용한 내용을 정리해보고자 합니다.
Swagger
Swagger는 API를 설계, 빌드, 문서화를 위한 도구의 집합체입니다. 기본적으로 개발자가 API를 이해하고 사용할 수 있도록 API의 명세를 문서화하는 데 사용됩니다.
Swagger는 Spring 전용 프레임워크가 아닌 OAS(OpenAPI Specification)라는 표준 형식으로 API를 문서화 합니다. 또한 OpenAPI로서 JS, Python 등 다양한 언어에서 사용할 수 있습니다.
API 문서 자동화가 가능하지만, Spring 환경에서 Swagger를 사용하려면 Swagger UI 설정, Swagger 애너테이션으로 API 메타데이터를 읽는 과정을 직접 구현해야하는 작업이 필요합니다. 그렇지만, SpringFox과 SpringDoc 라이브러리를 이용해 복잡한 과정을 줄여 API 문서를 만들 수 있습니다.
Swagger 핵심 기능
API 문서화 : API의 엔드포인트, 매개변수, 응답 형식 등을 문서화 할 수 있습니다.
API 테스트 : UI 상에서 매개변수 값을 수정하여 API를 테스트 할 수 있으며, 응답시간도 같이 확인할 수 있습니다.
클라이언트 코드 생성 : 클라이언트 코드가 자동으로 생성되며, 이를 통해 개발자는 API를 사용하기 위한 클라이언트 코드를 수동으로 작성할 필요가 없습니다.
SpringFox와 SpringDoc
SpringFox, SpringDoc 모두 Spring Framework 기반의 프로젝트에서 Swagger를 통합하여 API를 쉽게 문서화하고 시각화 할 수 있습니다.
SpringFox의 경우 2020년 기준으로 업데이트가 멈춘 상태이고 Spring Boot 3에서는 지원되지 않고 있습니다. SpringDoc의 경우 계속해서 업데이트되고 있어 재고관리 시스템에서는 SpringDoc를 이용해보겠습니다.
SpringFox : https://mvnrepository.com/artifact/io.springfox
SpringDoc : https://mvnrepository.com/artifact/org.springdoc
SpringDoc과 Swagger 적용해보기
build.gradle 의존성 추가
1
implementation 'org.springdoc:springdoc-openapi-starter-webmvc-ui:2.5.0'
SpringDoc 1.8.0 버전까지 Spring Boot 1.x, 2.x 버전을 지원하며 SpringDoc 2.x 버전의 경우 Spring Boot 3을 지원합니다.
Swagger UI 확인

의존성 추가 후 http://localhost:8080/swagger-ui.html 접속하면 기본 Swagger UI를 확인할 수 있습니다.
SwaggerConfig 클래스 생성
1
2
3
4
5
6
7
8
9
10
11
12
13
14
15
16
17
18
19
20
21
22
23
24
25
26
27
28
29
30
31
32
@OpenAPIDefinition(
    info = @Info(
        title = "금은방 재고관리 API",
        description = "카다로그/고객/주문/수리/재고/판매/거래처/현금 관리 API 문서",
        version = "4.8.10"
    )
)
@Configuration
public class SwaggerConfig {

  @Value("${jwt.value.grant}")
  private String bearer;

  @Bean
  @Profile({"!blue","!green"}) //운영 환경에는 Swagger를 비활성화하기 위해 추가
  public OpenAPI openAPI() {
      String jwtSchemeName = "jwtAuth";
      SecurityRequirement securityRequirement = new SecurityRequirement().addList(jwtSchemeName);

      Components components = new Components()
          .addSecuritySchemes(jwtSchemeName, new SecurityScheme()
              .name(jwtSchemeName)
              .type(SecurityScheme.Type.HTTP)
              .scheme(bearer)
              .bearerFormat("JWT")
          );

      return new OpenAPI()
          .components(components)
          .addSecurityItem(securityRequirement);
    }
}
@OpenAPIDefinition
OpenAPI 제목, 설명, 버전을 설정할 수 있습니다. 애너테이션이 아닌 Info 객체를 통해 제목, 설명, 버전을 입력하고 OpenAPI 객체에 추가할 수 있습니다.
@Profile
Profile별 Swagger를 활성화/비활성화 하기 위해 추가합니다.
Components / SecurityRequirement
JWT 인증의 경우 API 테스트할 때 매번 토큰을 설정해주어야 하는 점을 한번만 인증하여 테스트할 수 있도록 합니다.
application.yml 설정
1
2
3
4
5
6
7
8
9
10
11
12
13
14
15
16
17
18
19
20
21
22
23
24
25
26
27
28
29
30
31
32
33
34
35
36
37
38
39
...

springdoc:
  swagger-ui:
    path: /swagger-ui.html
    groups-order: DESC
    tags-sorter: alpha
    operations-sorter: alpha
    disable-swagger-default-url: true
    display-request-duration: true
  api-docs:
    path: /api-docs
    group.enabled: true
  group-configs:
    - group: 카다로그
      paths-to-match: /api/catalog/**
    - group: 고객
      paths-to-match: /api/customer/**
    - group: 주문
      paths-to-match: /api/order/**
    - group: 수리
      paths-to-match: /api/repair/**
    - group: 재고
      paths-to-match: /api/stock/**
    - group: 판매
      paths-to-match: /api/sale/**
    - group: 거래처
      paths-to-match: /api/vender/**
    - group: 금/현금
      paths-to-match: /api/cash/**
    - group: 코드
      paths-to-match: /api/code/**
    - group: 사용자
      paths-to-match: /api/user/**
  show-actuator: false
  default-consumes-media-type: application/json
  default-produces-media-type: application/json
  # Spring Security로 인증/인가 구현 시 login endpoint 출력 설정
  show-login-endpoint: false
| 옵션 | 설명 | 설정 값 |
|---|---|---|
| path | swagger-ui 접근 경로 설정 (default: swagger-ui.html) | |
| groups-order | 각 API의 그룹 표시 순서 설정 (path, query, body, response 순으로 출력) | |
| tags-order | 태그 정렬 순서 설정 | alpha: 알파벳 순 정렬 method: OpenAPI specification file에 원하는 태그 정렬 방식 직접 기재 |
| operations-sorter | 컨트롤러 메소드 정렬 순서 설정 | alpha : 알파뱃 순으로 정렬 method: delete - get - patch - post - put 순으로 정렬 |
| disable-swagger-default-url | swagger-ui default url인 petstore html의 비활성화 설정 (default: false) | |
| display-request-duration | swagger-ui에서 try 했을 때 Request duration 출력 여부 설정 | |
| api-docs.path | API 문서 경로 설정 (default: /v3/api-docs) | |
| api-docs.group.enable | API 그룹 여부 설정 (default: true) | |
| group-configs | API 그룹을 설정(다중 설정 가능) | group: API 그룹명 설정 paths-to-match: 해당 그룹에 매칭할 URI 경로 설정 packages-to-scan: 해당 그룹에 매칭할 패키지 설정 |
| show-actuator | Spring Boot Admin Acturator 여부 설정 (default: false) | |
| default-consumes-media-type | 요청에 대한 Default MediaType 설정 (default: application/json) | |
| default-produces-media-type | 응답에 대한 Default MediaType 설정 (default: application/json) | |
| show-login-endpoint | Spring Security로 인증/인가 구현 시 login endpoint 출력 설정 |
추가적인 설정은 SpringDoc 공식 사이트에서 확인할 수 있습니다.
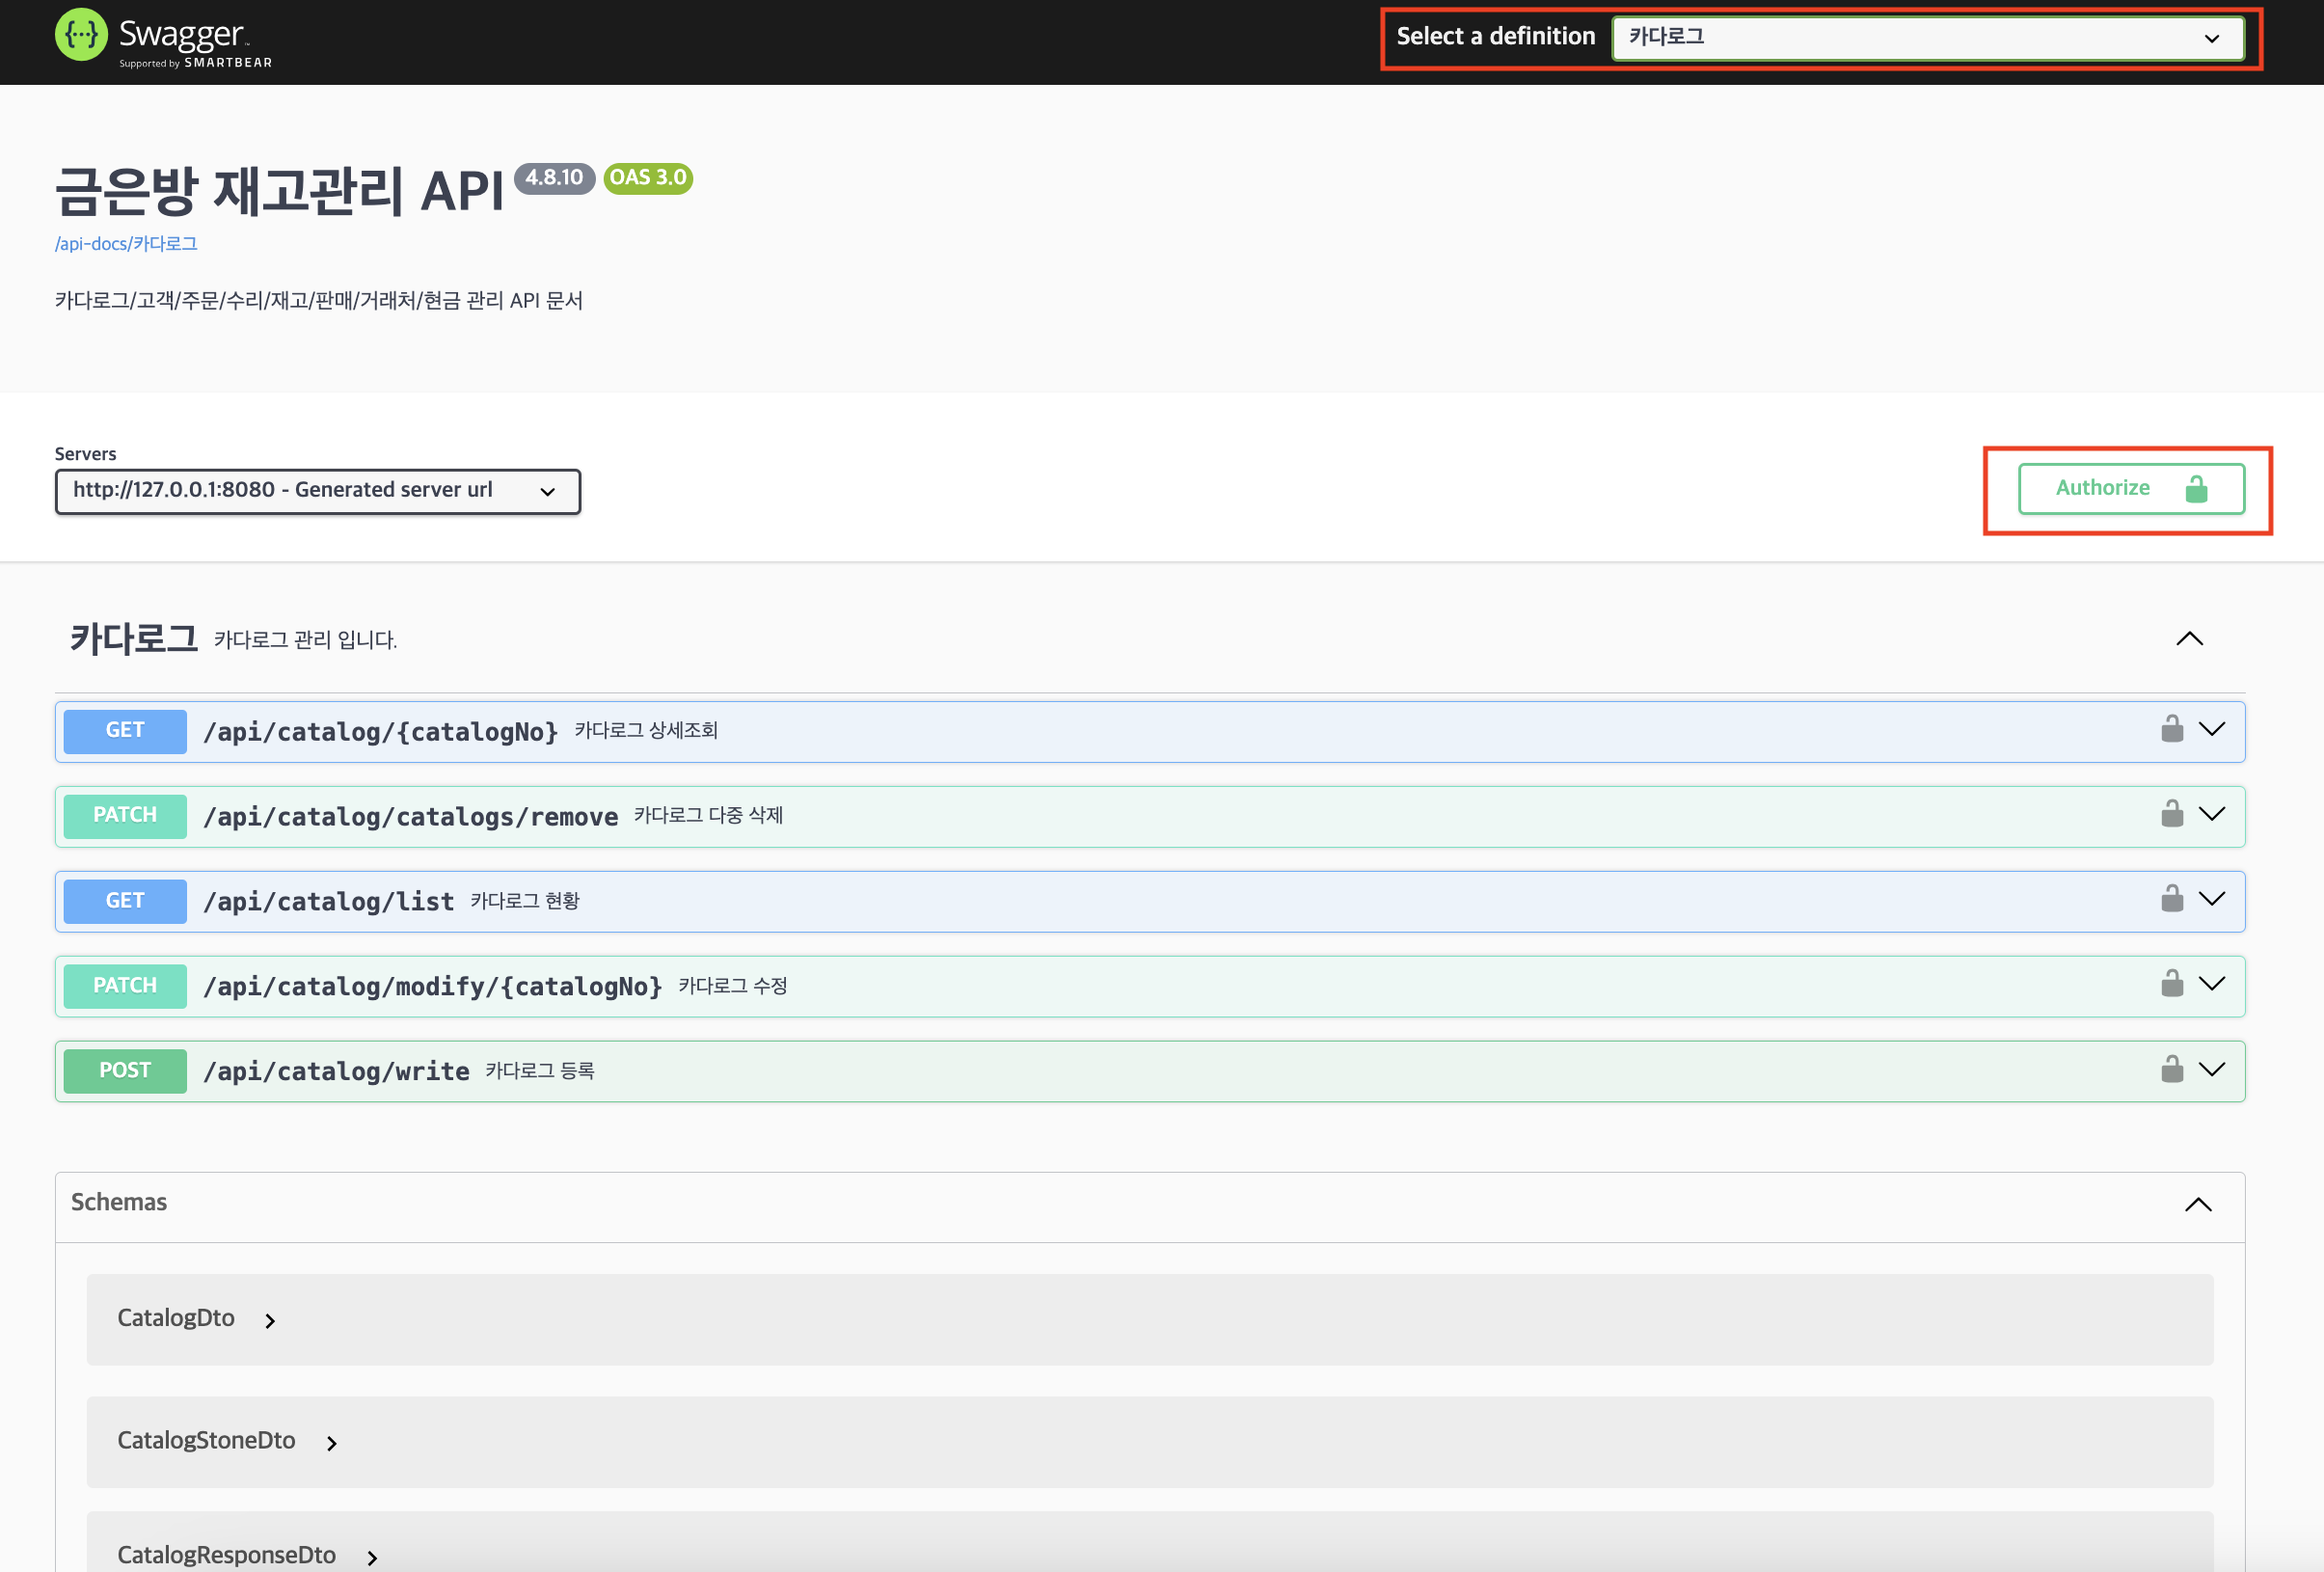
Swagger 설정 후 Swagger UI 확인
전체 설정에 대한 Swagger UI 화면은 아래와 같으며, 우측 상단의 드롭박스(Select a definition)에서 그룹을 확인하실 수 있습니다.
JWT 인증의 경우 Authorize 버튼을 선택하여 토큰 입력 후 인증하면 정상적으로 API 테스트를 할 수 있습니다.
클래스 및 API 설정
1
2
3
4
5
6
7
8
9
10
11
12
13
14
15
16
17
18
19
20
21
22
23
24
25
26
27
28
29
30
31
32
33
34
35
36
37
38
39
40
41
42
43
@Tag(name = "카다로그", description = "카다로그 관리 입니다.")
@RestController
@RequestMapping("/api/catalog")
@RequiredArgsConstructor
public class CatalogApiController {
...
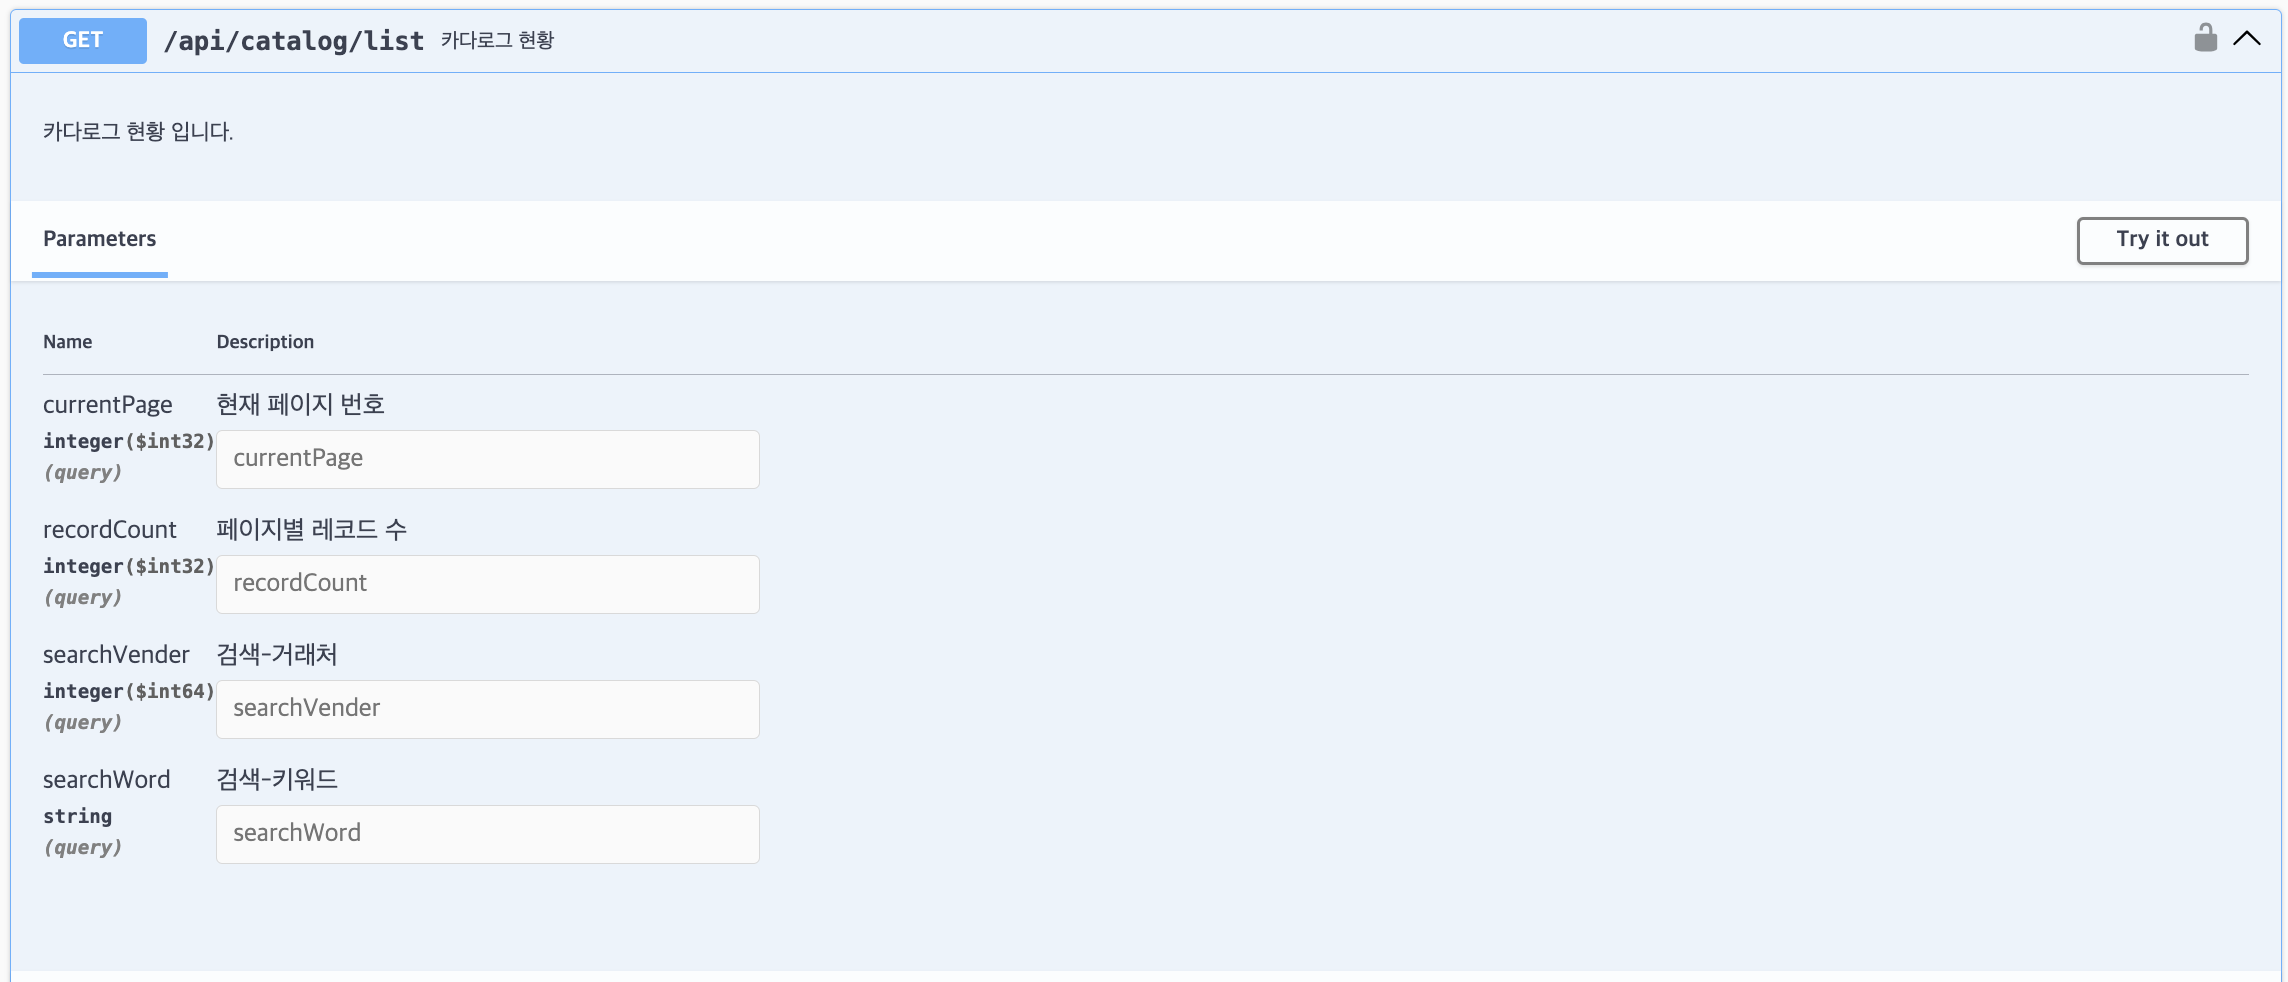
@Operation(summary = "카다로그 현황", description = "카다로그 현황 입니다.")
@ApiResponses({
@ApiResponse(
responseCode = "200", description = "페이징 및 카다로그 리스트를 반환합니다.",
content = @Content(
schemaProperties = {
@SchemaProperty(name = "params", schema = @Schema(implementation = SearchDto.class)),
@SchemaProperty(
name = "list",
array = @ArraySchema(
schema = @Schema(
implementation = CatalogResponseDto.class
)
)
)
}
)
),
@ApiResponse(responseCode = "500", description = "Internal Server Error")
})
@GetMapping("/list")
public Map<String, Object> list(
@Parameter(description = "현재 페이지 번호") @RequestParam(required = false) Integer currentPage,
@Parameter(description = "페이지별 레코드 수") @RequestParam(required = false) Integer recordCount,
@Parameter(description = "검색-거래처") @RequestParam(required = false) Long searchVender,
@Parameter(description = "검색-키워드") @RequestParam(required = false) String searchWord
){
SearchDto searchDto = new SearchDto(currentPage, recordCount, searchVender, searchWord);
Pageable pageable = PageRequest.of(searchDto.getCurrentPage()-1, searchDto.getRecordCount());
return catalogService.findAll(searchDto, pageable);
}
...
}
@Tag
클래스를 Swagger 리소스로 표시합니다. API 메소드에 Tag를 설정할 경우 메소드별로 출력되게 됩니다. 
- name : 태그 명을 작성할 수 있습니다. 태그명을 설정하지 않을 경우 디폴트 태그명은 catalog-api-controller가 됩니다.
- description : 해당 태그에 대한 설명을 작성할 수 있습니다.
@Operation
특정 경로에 대한 작업에 대한 내용을 작성할 수 있습니다. 
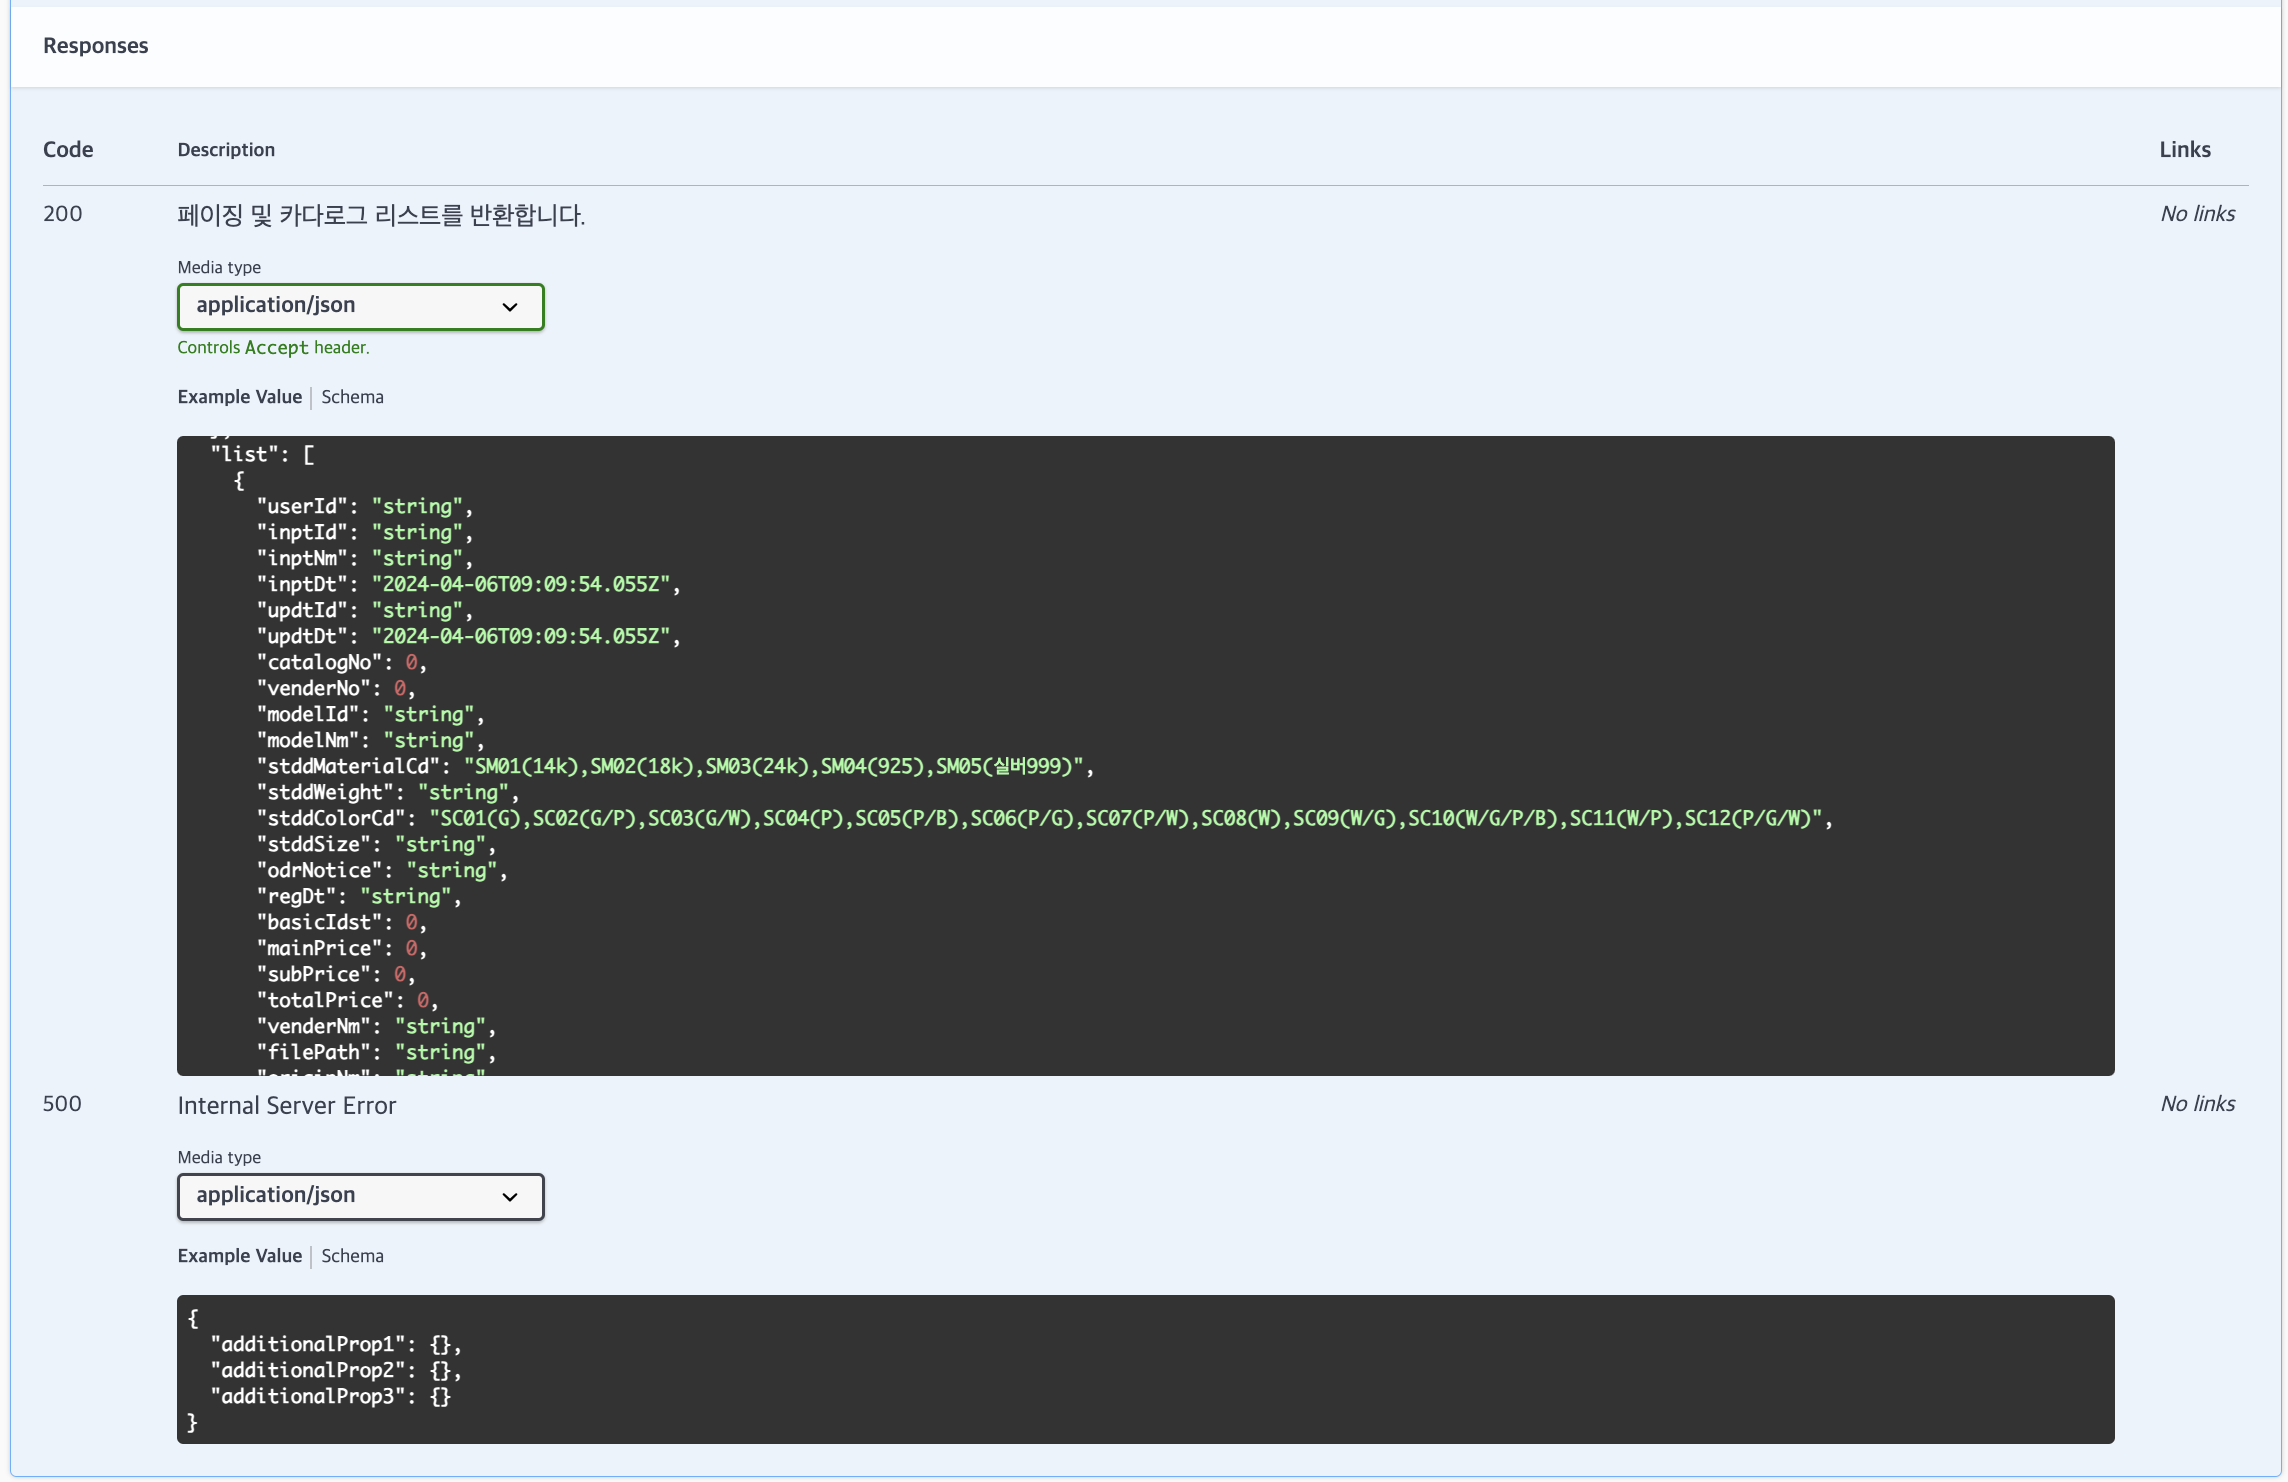
@ApiResponses
작업에 대한 응답 내용을 작성할 수 있습니다.
@ApiResponse : 응답 별 세부 내용을 지정합니다. 현재 Map 반환으로 되어있으며 params, list 키와 대한 값들이 구성되어있습니다. 각 값들에 세부사항은 @Content, @SchemaProperties, @ArraySchema, @Schema를 이용해 출력할 수 있습니다.
@Parameter: API 작업에서 단일 매개 변수에 대한 내용을 작성할 수 있습니다.
API 모델 설정
API 모델의 경우 Schemas에서 확인할 수 있으며, 그룹에서 사용하는 모든 API 모델을 확인할 수 있습니다. 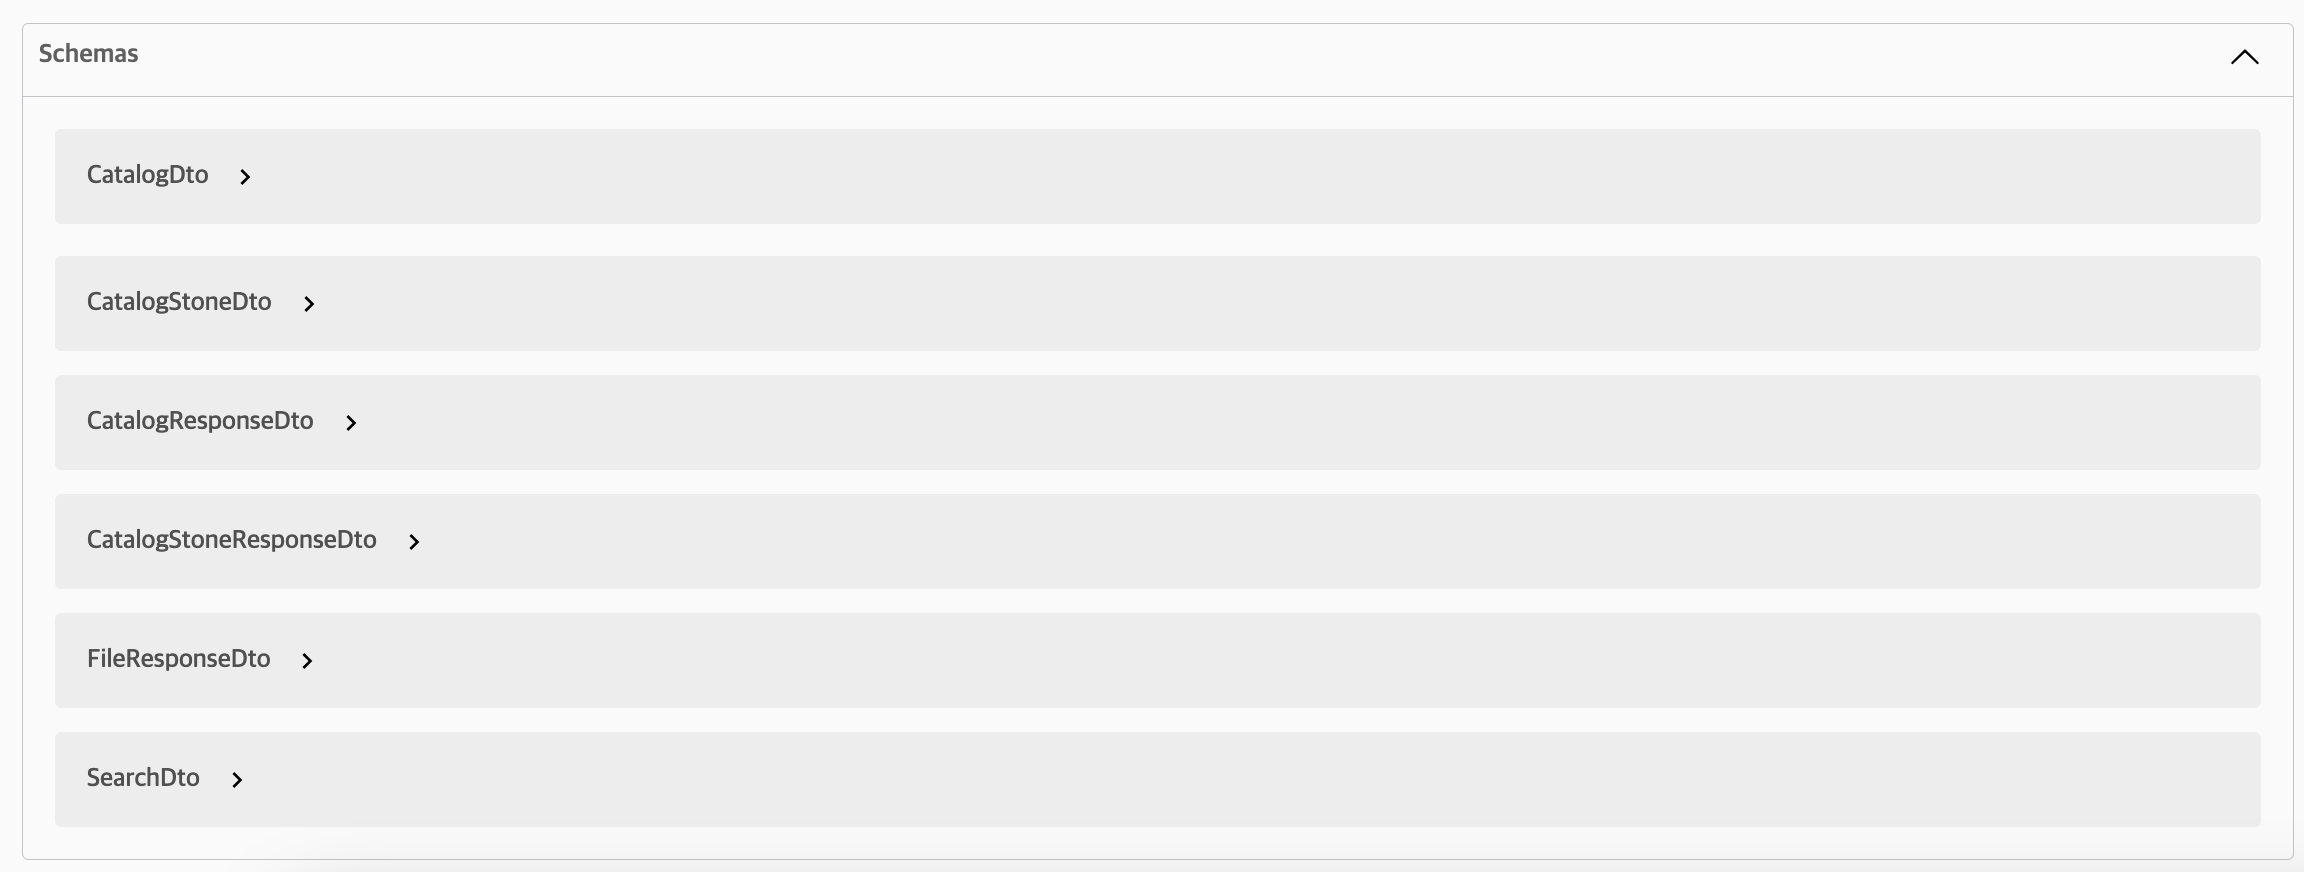
1
2
3
4
5
6
7
8
9
10
11
12
13
14
15
16
17
18
19
20
21
22
23
24
25
26
27
28
29
30
31
32
33
34
35
36
@Getter
@Setter
@NoArgsConstructor(access = AccessLevel.PROTECTED)
@Schema(description = "카다로그 응답 DTO")
public class CatalogResponseDto extends CommonVO {

  @Schema(type = "Long", description = "카다로그PK(자동)")
  private Long catalogNo;

  @Schema(type = "Long", description = "거래처번호(FK)")
  private Long venderNo;

  @Schema(type = "String", description = "모델번호", maxLength = 100)
  private String modelId;

  @Schema(type = "String", description = "모델명", maxLength = 60)
  private String modelNm;

  @Schema(type = "String", description = "표준재질 코드", example = "SM01(14k),SM02(18k),SM03(24k),SM04(925),SM05(실버999)", maxLength = 20)
  private String stddMaterialCd;

  @Schema(type = "String", description = "표준중량(g)")
  private String stddWeight;

  @Schema(type = "String", description = "표준색상 코드", example = "SC01(G),SC02(G/P),SC03(G/W),SC04(P),SC05(P/B),SC06(P/G),SC07(P/W),SC08(W),SC09(W/G),SC10(W/G/P/B),SC11(W/P),SC12(P/G/W)", maxLength = 20)
  private String stddColorCd;

  @Schema(type = "String", description = "포준사이즈 코드")
  private String stddSize;

  @Schema(type = "String", description = "등록일", format = "yyyy-MM-dd")
  private String regDt;

  ...

}
- @Schema : 클래스, 필드 단위에 Swagger 모델에 대한 추가 정보(타입, 설명, 최소/최대 길이, 예시, 포맷 등)를 작성할 수 있습니다.
모델의 추가 정보 작성 후 해당 모델을 확인하면 아래와 같이 설정한 타입, 설명, 포맷에 대한 정보를 확인하실 수 있습니다. 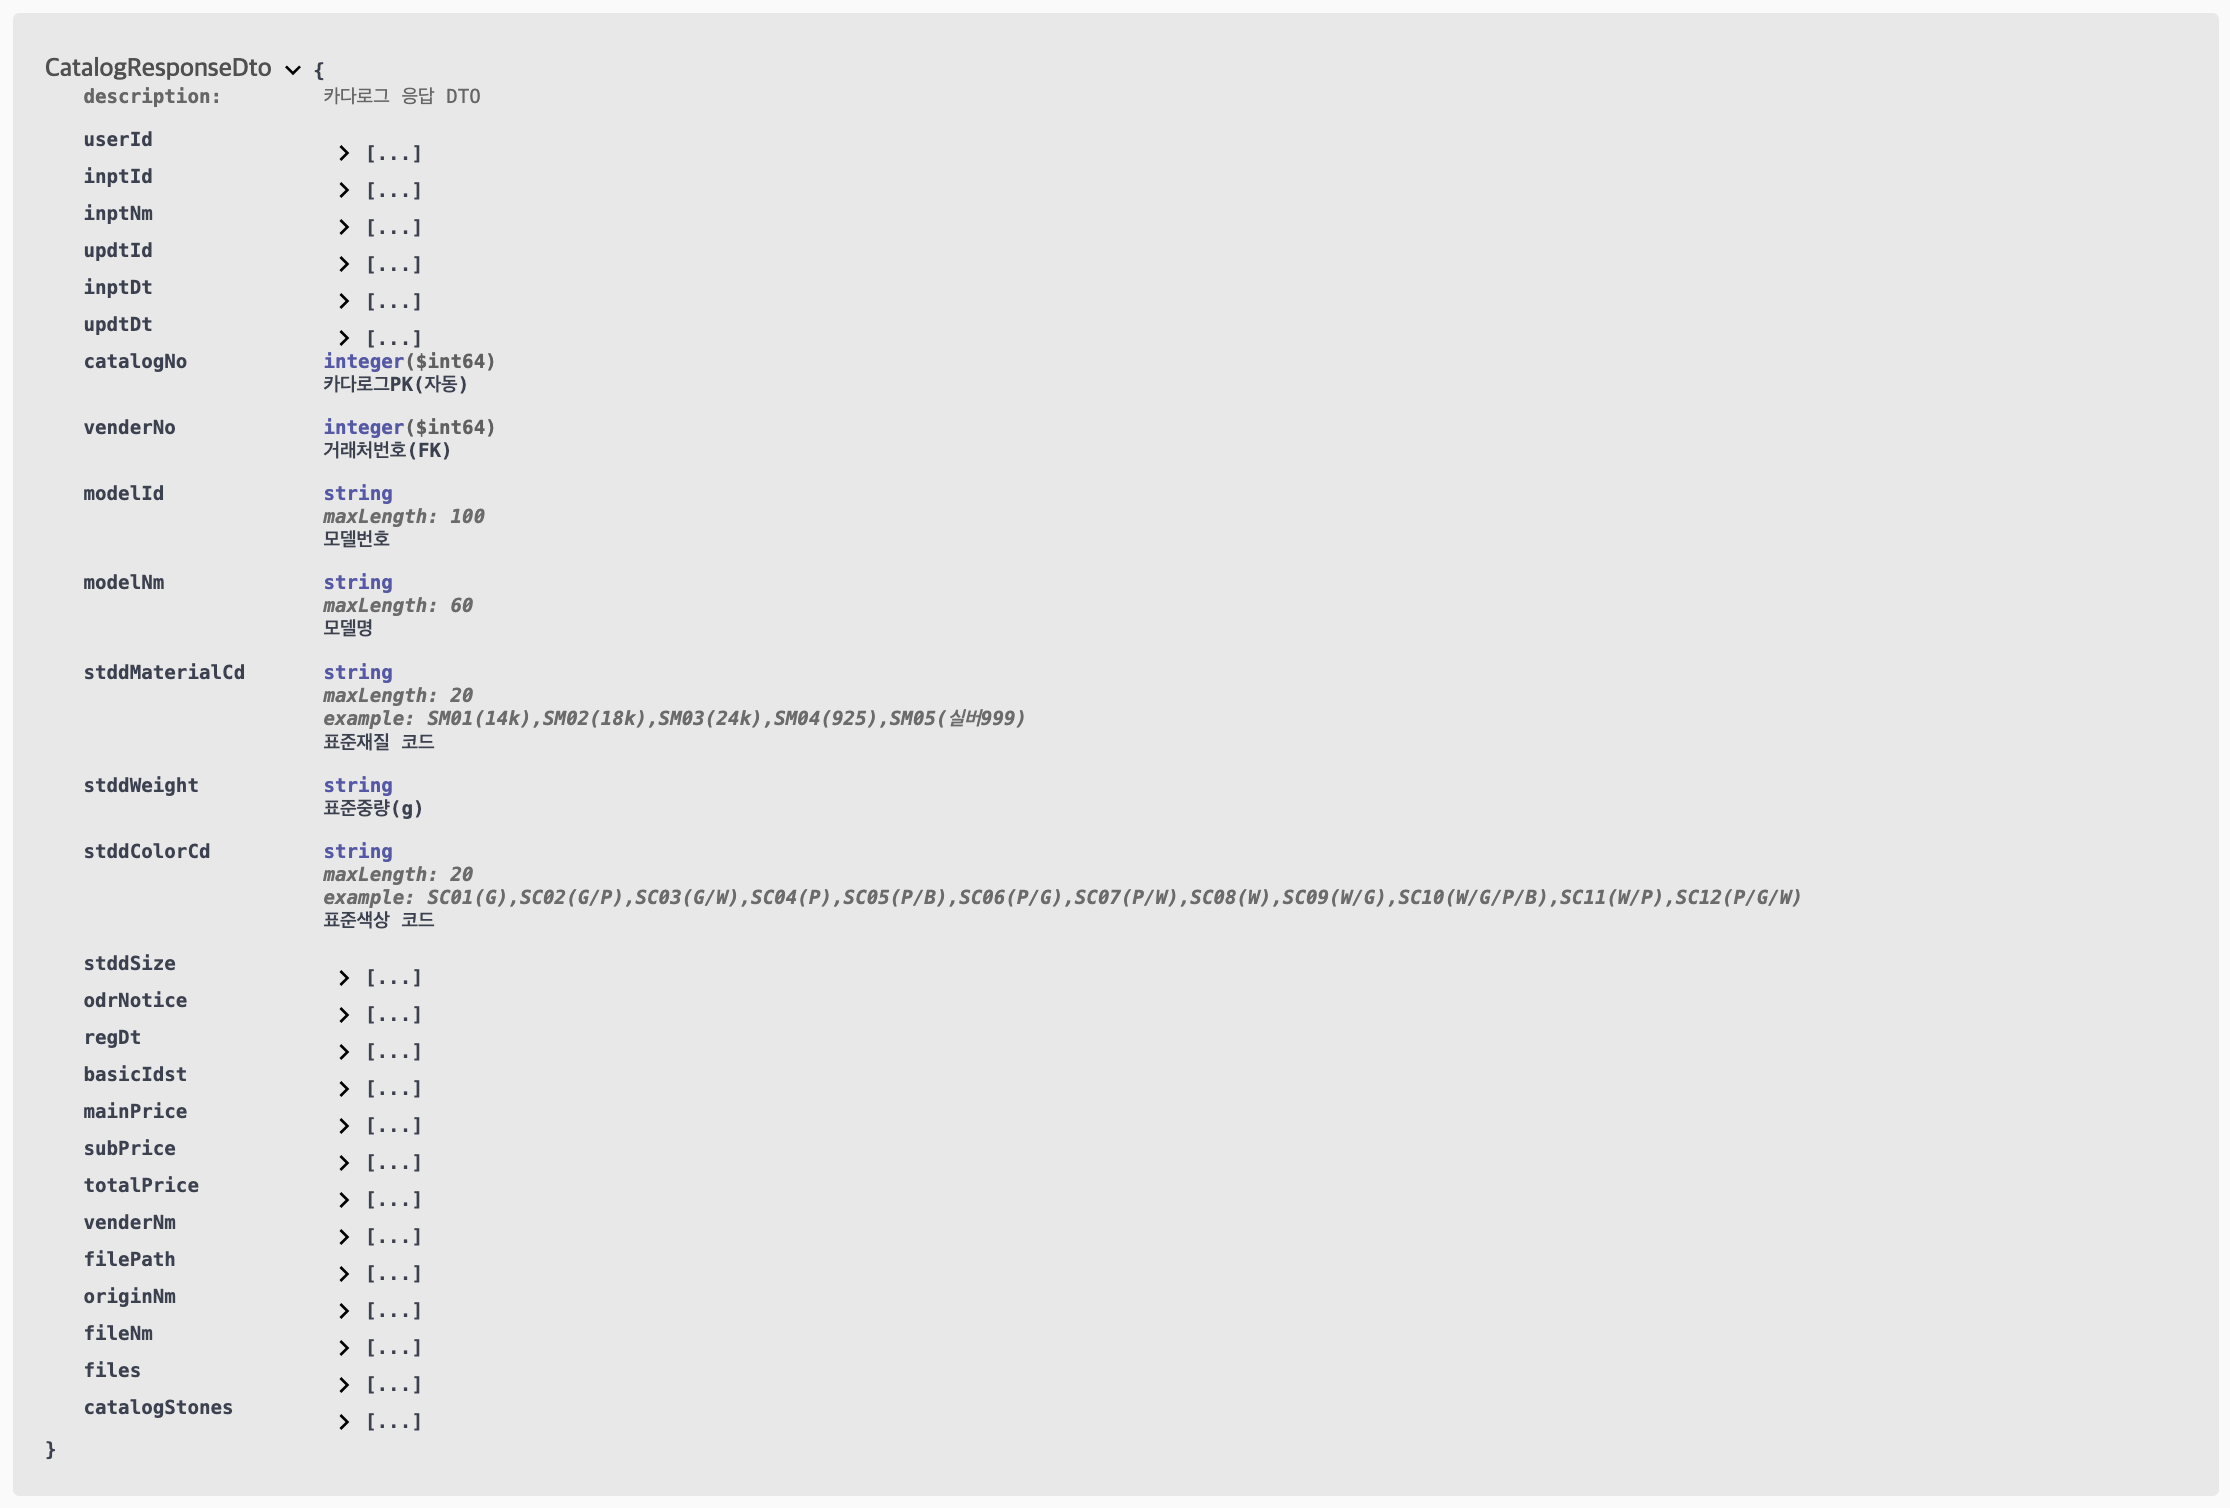
그룹 전체 API 작업 및 모델 보기
Json 형식 API 문서 확인
아래 표시된 부분의 링크를 클릭하면 해당 그룹의 전체 API 작업 및 모델을 Json 형식으로 확인할 수 있습니다. 
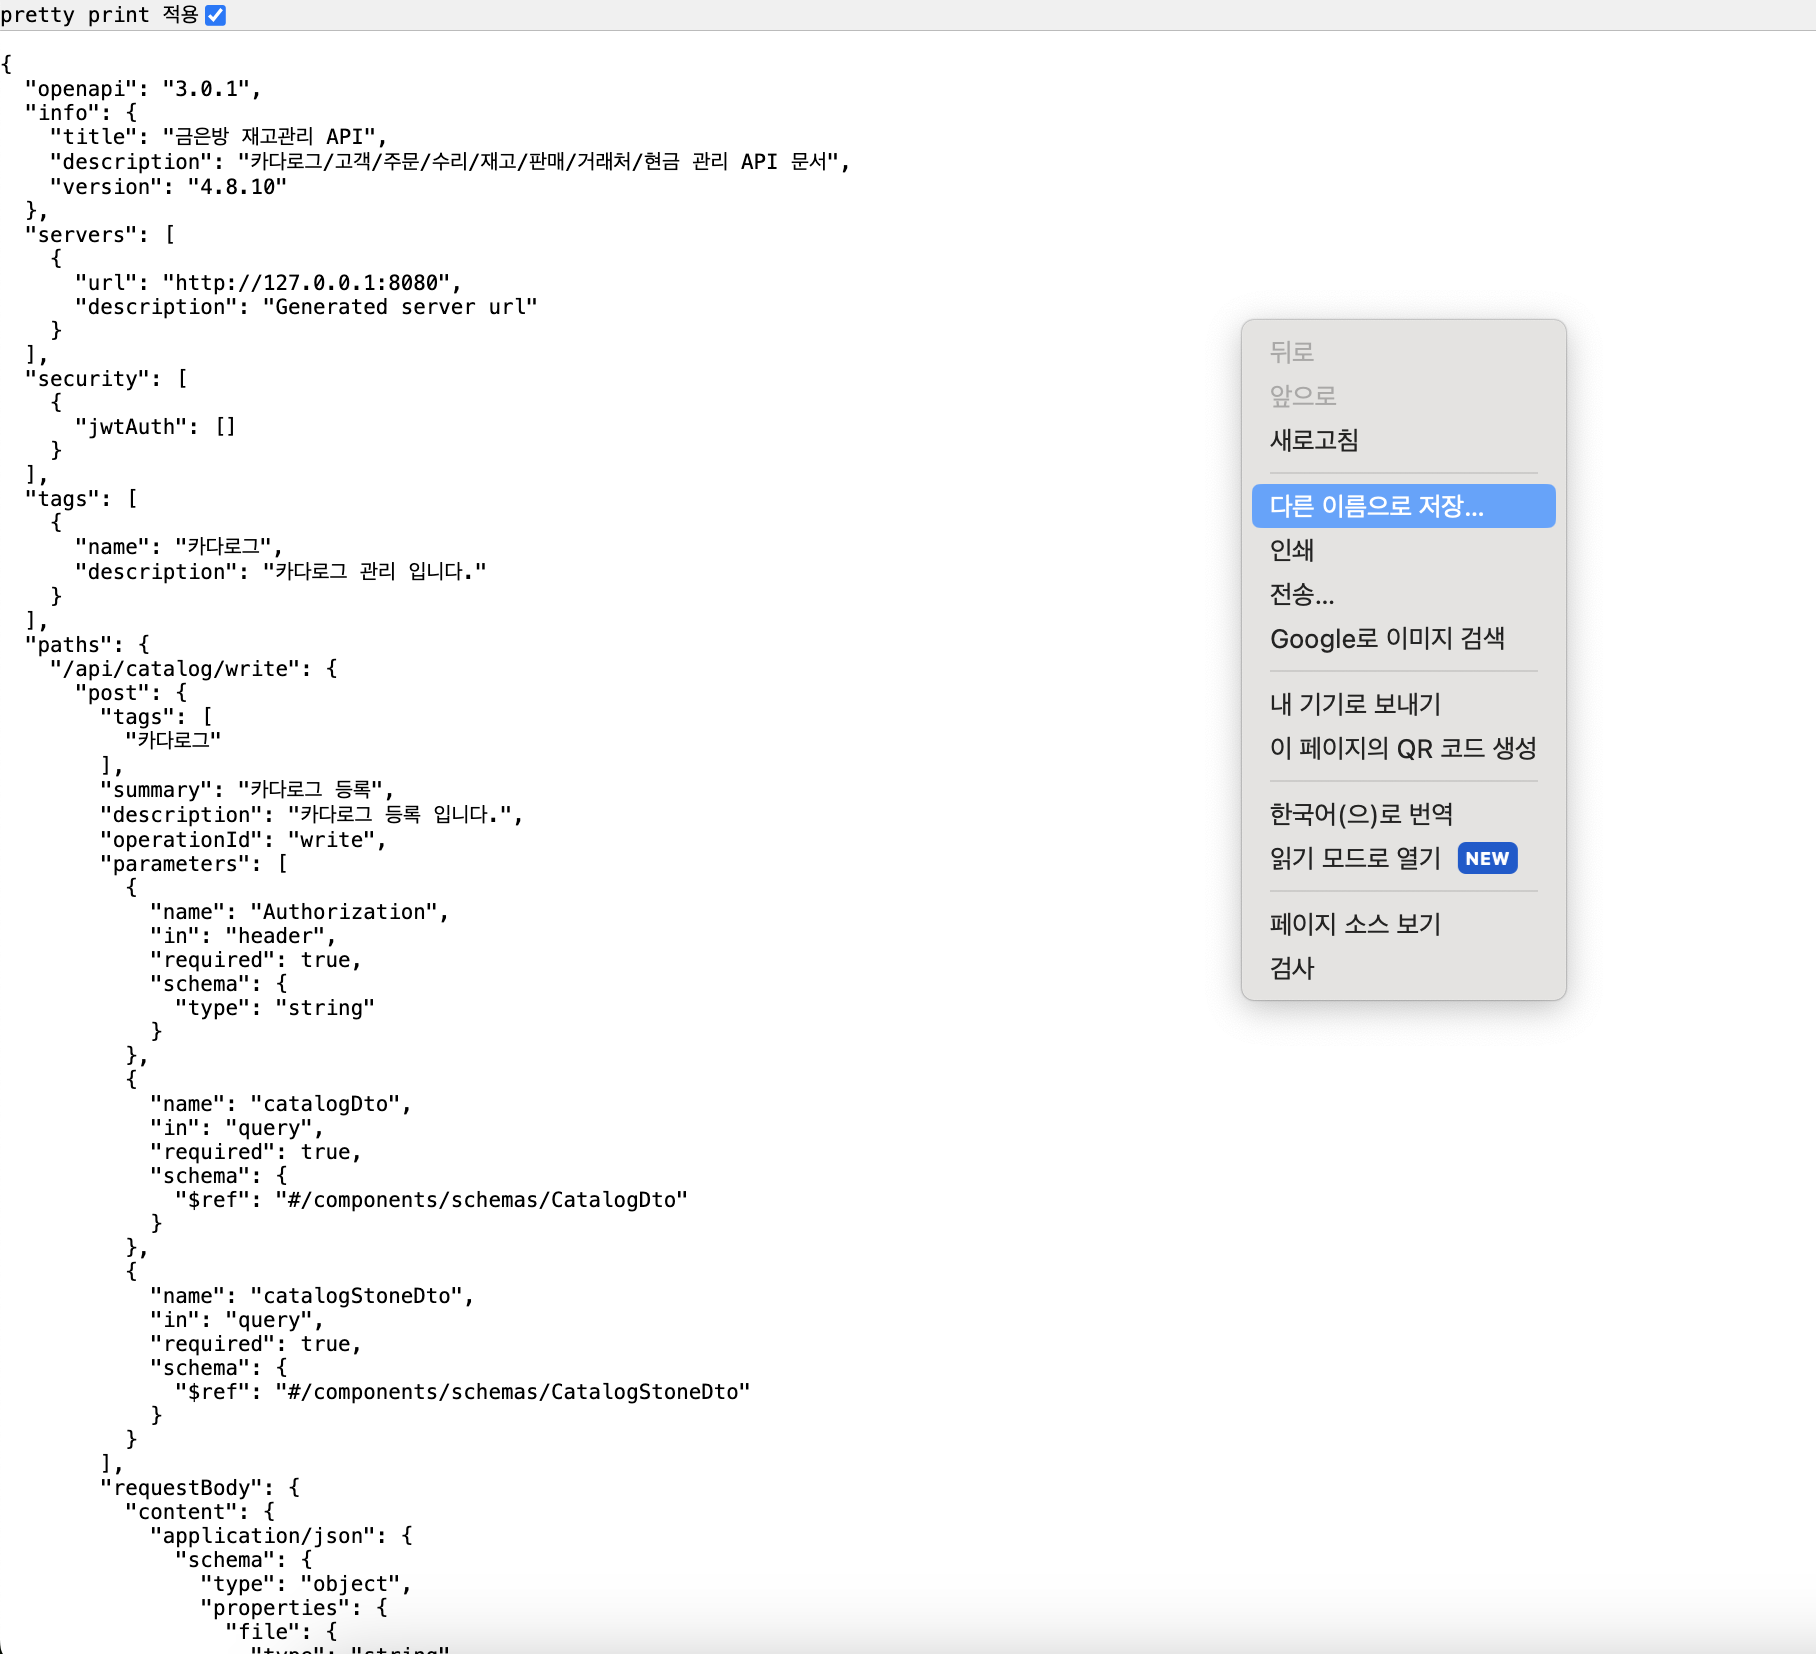
문서를 다른 이름으로 저장하면 Json 파일이 저장되며 이 파일을 Swagger Editor에서 열어서 확인할 수 있습니다
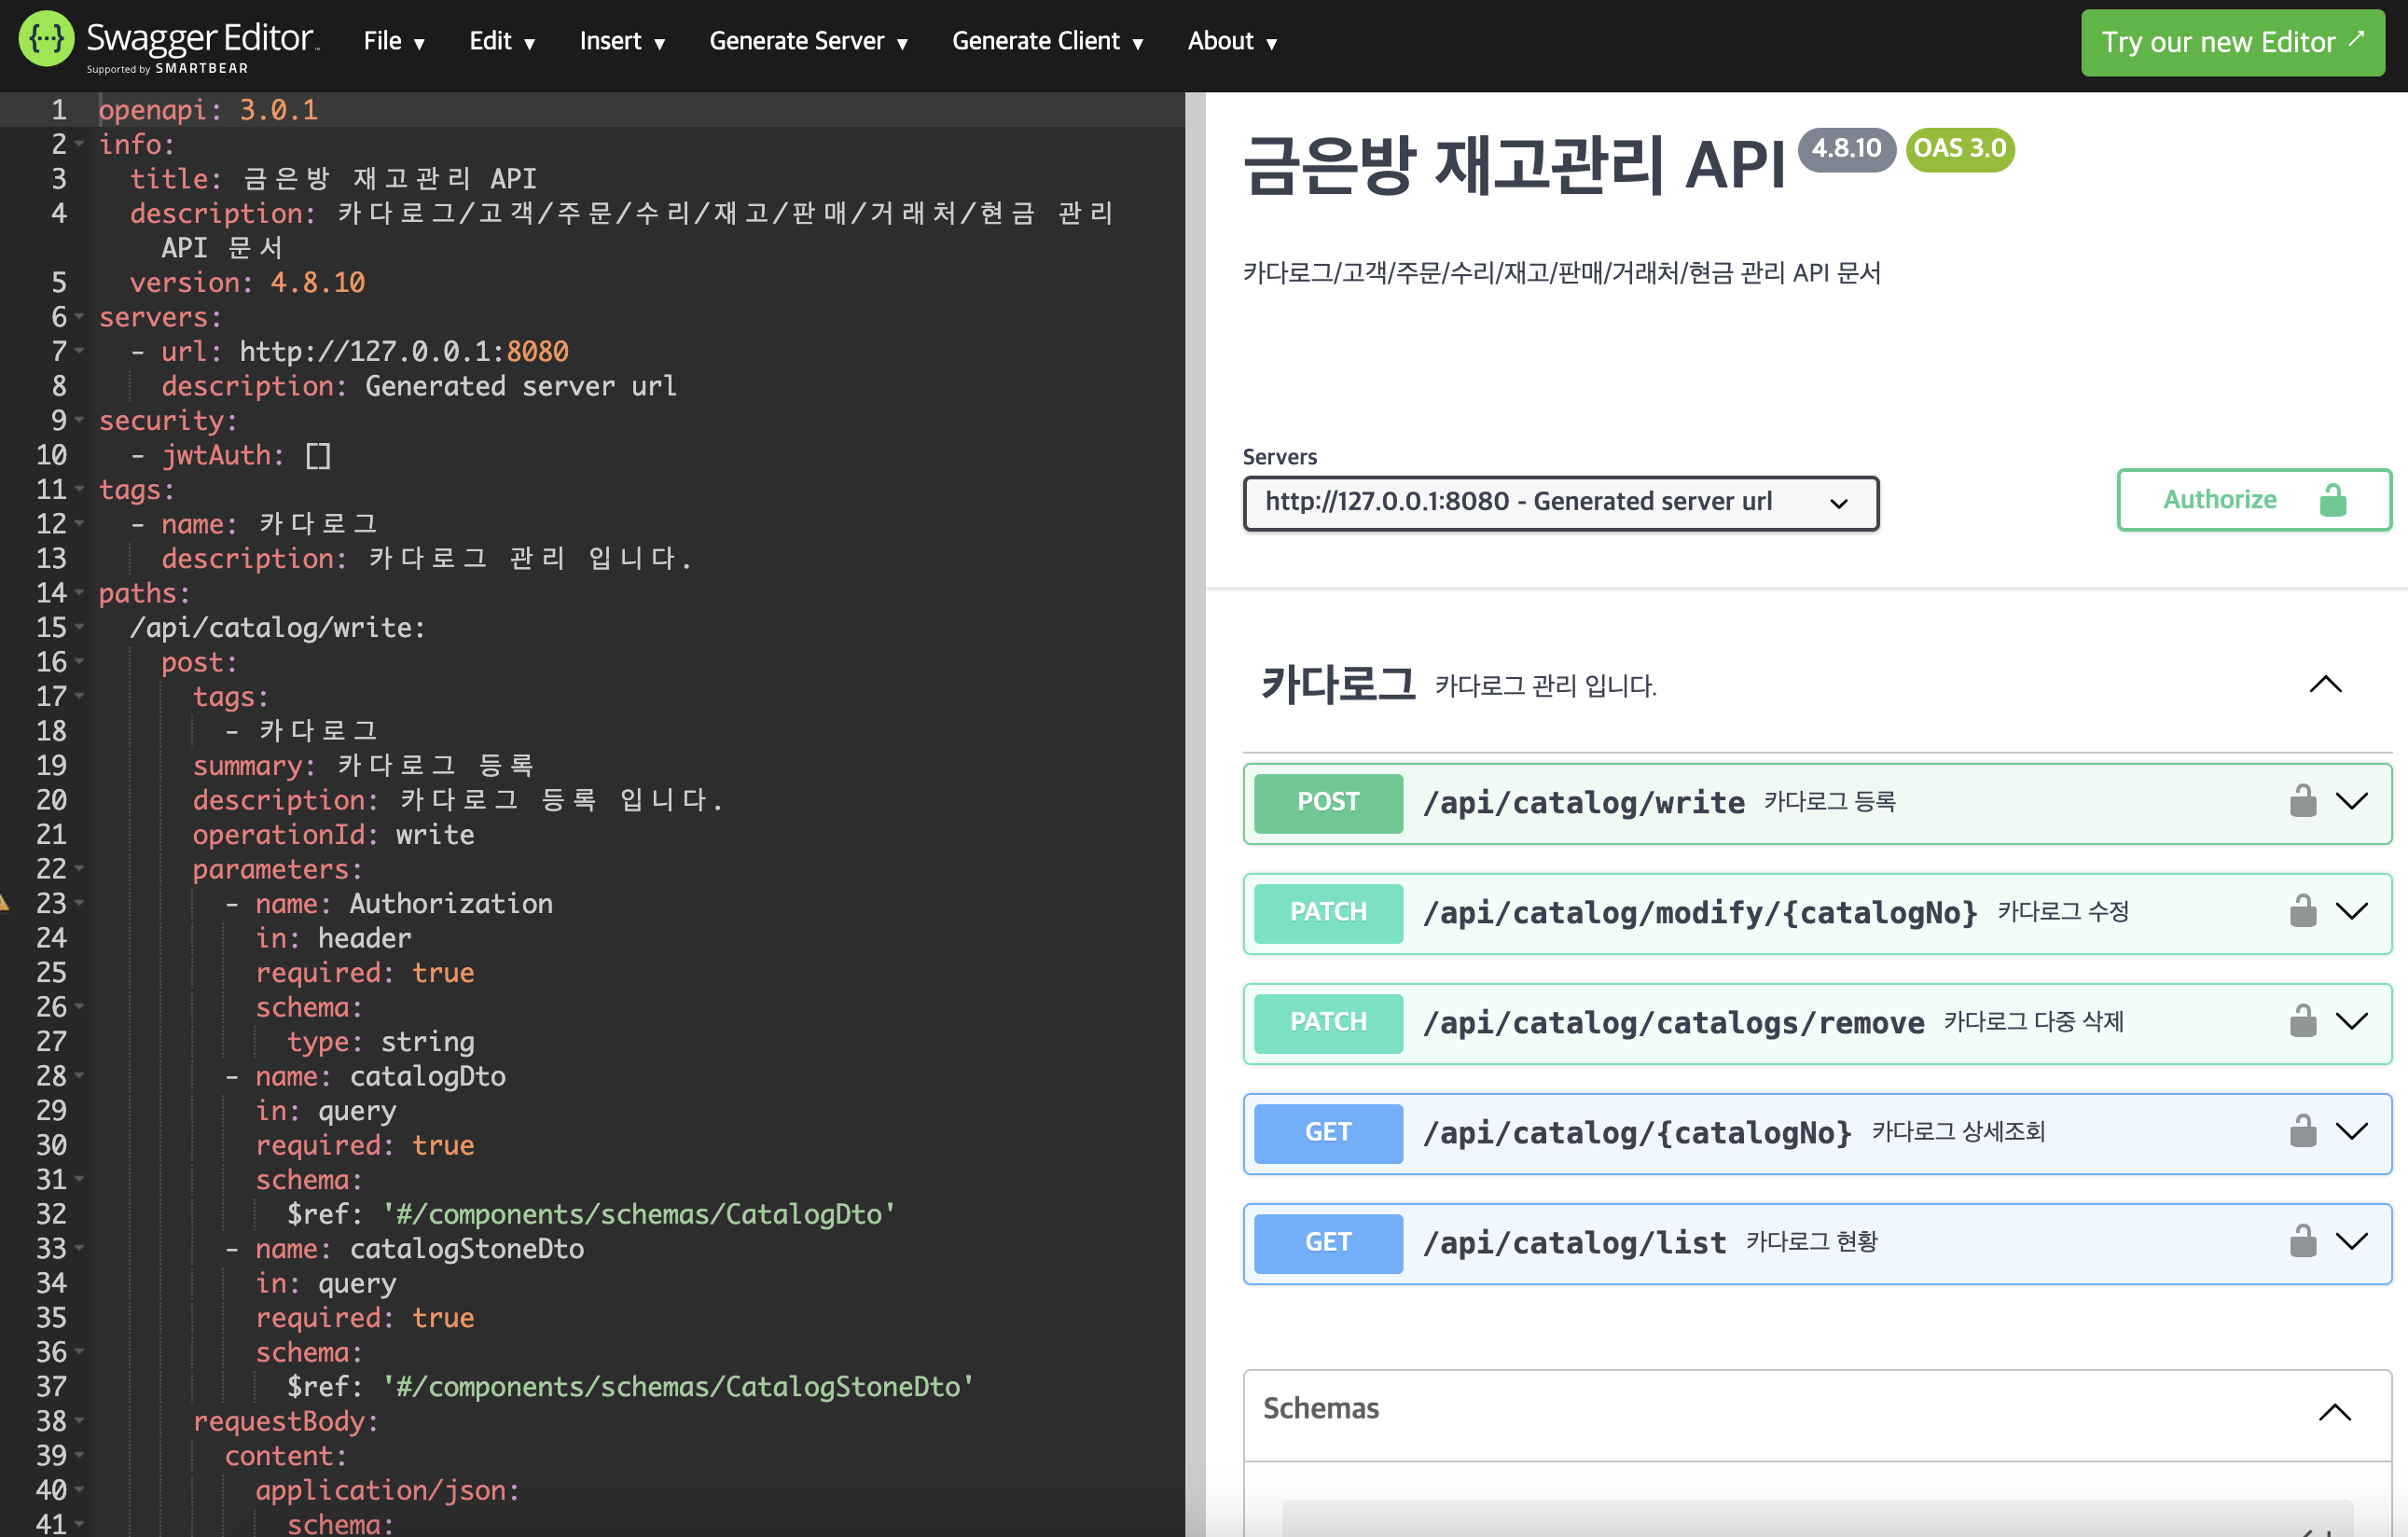
Swagger Editor
Swagger Editor에 접속해 다운로드한 Json 파일을 추가하면(File → Import file) 아래와 같이 API 문서를 확인할 수 있으며, Swagger-UI와 같은 구조를 확인할 수 있고 API 테스트도 가능합니다.